ISP`s IT Аутсорсинг
Быстрый переход: Главная блога Главная сайта Форум
Если Вы чего то недопоняли или не нашли - задайте
вопрос на нашем форуме и мы попробуем Вам помочь.
Subnets.ru Регистрация IP и Автономных систем mega-net.ru

Метки статьи: ‘bgp4’

Добро пожаловать в блог! Надеемся, что Вы еще вернетесь.

С первого момента как я познакомился с оборудованием Juniper серии «M» я хотел попробовать фичу с логическими системами, т.е. создать роутер внутри роутера, но все как то руки не доходили. То времени не было, то свободной автономки с адресами.

И вот оно случилось, снова появилась свежеполученная AS с блоком адресов и я все же выкроил время для теста.

Пишу данный пост, что бы потом самому не забыть как это делалось, т.к. м.б. я тупой или жара так влияет на мозг человека, но как законектить основную систему с виртуальной я догнал не сразу, даже после того как «покурил» мануалы на juniper.net.

Дано

  • Juniper M7i
  • на нем уже поднят BGP с несколькими апстримами

Задача

Сделать виртуальный роутер (logical-system) внутри реального роутера, соединить их по протоколу BGP и проанонсировать новую ASку в Инет.

Connect Logical System BGP to Main system BGP.

Решение

Logical System Overview

Logical systems perform a subset of the actions of a physical router and have their own unique routing tables, interfaces, policies, and routing instances. A set of logical systems within a single router can handle the functions previously performed by several small routers.

The following are supported on logical systems:
Open Shortest Path First (OSPF), Intermediate System-to-Intermediate System (IS-IS), Routing Information Protocol (RIP), RIP next generation (RIPng), Border Gateway Protocol (BGP), Resource Reservation Protocol (RSVP), Label Distribution Protocol (LDP), static routes, various multicast protocols, and IP version 4 (IPv4) and version 6 (IPv6) are supported at the [edit logical-systems protocols] hierarchy level.
Basic Multiprotocol Label Switching (MPLS) for core provider router functionality is supported at the [edit logical-systems protocols mpls]] hierarchy level.
All policy-related statements available at the [edit policy-options] hierarchy level are supported at the [edit logical-systems policy-options] hierarchy level.
Most routing options statements available at the [edit routing-options] hierarchy level are supported at the [edit logical-systems routing-options] hierarchy level. Only the route-record statement is not supported at the [edit logical-systems routing-options] hierarchy level.
Graceful Routing Engine switchover (GRES) is supported.
You can assign most interface types to a logical system, including SONET interfaces, Ethernet interfaces, Asynchronous Transfer Mode (ATM) interfaces, ATM2 interfaces, Channelized Q Performance Processor (QPP) interfaces, aggregated interfaces, link services interfaces, and multilink services interfaces.
Source class usage, destination class usage, unicast reverse path forwarding, class of service, firewall filters, class-based forwarding, and policy-based accounting work with logical systems when you configure these features on the physical router.
Multicast protocols, such as Protocol Independent Multicast (PIM) and Distance Vector Multicast Routing Protocol (DVMRP) are supported at the [edit logical-systems logical-system-name protocols] hierarchy level. Rendezvous point (RP) and source designated router (DR) functionality for multicast protocols within a logical system is also supported.
The Bidirectional Forwarding Protocol (BFD) is supported.

The following restrictions apply to logical systems:
You can configure a maximum of 15 logical systems on one physical router.
The router has only one configuration file, which contains configuration information for the physical router and all associated logical systems. Master users can access the full configuration. However, logical system users can access only the portion of the configuration related to their particular logical system.
All configuration commits performed by a logical system user are treated as commit private. For more information on the commit private command, see the JUNOS System Basics Configuration Guide.
If a logical system experiences an interruption of its routing protocol process (rpd), the core dump output is saved in a file in the following location: /var/tmp/rpd_logical-system-name.core-tarball.number.tgz. Likewise, if you issue the restart routing command in a logical system, only the routing protocol process (rpd) for the logical system is restarted.
If you configure trace options for a logical system, the output log file is stored in the following location: /var/tmp/logical-system-name.
The following Physical Interface Cards (PICs) are not supported with logical systems: Adaptive Services PIC, ES PIC, Monitoring Services PIC, and Monitoring Services II PIC.
Sampling, port mirroring, IP Security (IPsec), and Generalized MPLS (GMPLS) are not supported.
Label-switched path (LSP) ping and traceroute for autonomous system (AS) number lookup are not supported.
If you configure multiple logical systems, you can configure a VPLS routing instance only for the first logical system configured at the [edit logical-systems logical-system-name routing-instances instance-name protocols vpls] hierarchy level.

Начинаем «курить» мануалы:

Более-менее понятно, что соединить осноной роутер (main) с виртуальным (logical-system) можно через интерфейсы. Но как ?

Читаем мануалы далее и выясняем, что сделать это можно или с помощью петли, т.е. тупо соединив проводом два физических порта  маршрутизатора (один порт будет принадлежать реальной системе, а второй порт виртуальной) или с помощью «Logical Tunnel Interface«.

Соединять с помощью провода между двумя реальными интерфейсами роутера я не мог, в виду отсутствия свободных, остается «логика»:

On M Series and T Series routers, logical tunnel interfaces allow you to connect logical systems, virtual routers, or VPN instances. The router must be equipped with a Tunnel Services PIC or an Adaptive Services Module (only available on M7i routers)

Такс и где же этот встроенный Tunnel Services PIC ?

А вот он:

root@juniper> show chassis hardware

FPC 1                                                    E-FPC
  PIC 2                   BUILTIN      BUILTIN           1x Tunnel

Что видно в интерфейсах:
root@juniper> show interfaces lt-1/2/0

Physical interface: lt-1/2/0, Enabled, Physical link is Up
  Interface index: 142, SNMP ifIndex: 191
  Type: Logical-tunnel, Link-level type: Logical-tunnel, MTU: Unlimited, Speed: 800mbps
  Device flags   : Present Running
  Interface flags: Point-To-Point SNMP-Traps
  Link flags     : None
  Physical info  : 13
  Current address: 00:1f:12:d5:a0:bc, Hardware address: 00:1f:12:d5:a0:bc
  Last flapped   : 2010-07-17 00:24:41 MSD (2w6d 10:13 ago)
  Input rate     : 3088 bps (4 pps)
  Output rate    : 3088 bps (3 pps)

Получается, что все что нам нужно для выполнения задачи присутствует.

Прочитав Configuring Logical Tunnel Interfaces меня напрягли слова:

To connect two logical systems, you configure a logical tunnel interface on both logical systems.

«Эмм…. две логические…..» подумал я, а как же быть если я собираюсь законектить не две логические системы, а логическую и реальную ?

Смотрю на картинку  в примере настройки (Example: Configuring Logical Systems) и вижу что опять же виртуальные роутеры соединяются с реальными, но нигде реальные роутеры не соединяются с виртуальнфми внутри себя. Так делать нельзя ? Хм… как минимум странно.

Зрим в пример туннельного интерфейса:

lt-fpc/pic/port {
     unit logical-unit-number {
          encapsulation encapsulation;
          peer-unit unit-number; # peering logical system unit number
          dlci dlci-number;
          family (inet | inet6 | iso | mpls);
    }
}

Хм…. вроде все понятно, а вроде и нет ? Что такое peer-unit и какой номер указывать ? Читаем о peer-unit:

Syntax
peer-unit unit-number;
Hierarchy Level
[edit interfaces interface-name unit logical-unit-number],
[edit logical-systems logical-system-name interfaces interface-name unit logical-unit-number]
Release Information

Statement introduced before JUNOS Release 7.4.
Description

Configure a peer relationship between two logical systems.
Options

unit-number—Peering logical system unit number.
Usage Guidelines

See Configuring Logical Tunnel Interfaces.
Required Privilege Level

interface—To view this statement in the configuration.

interface-control—To add this statement to the configuration

Стало понятнее ? Мне нет….

Дальнейшее «курение» мануалов просветления в этом вопросе не принесло. Практика, попытки сделать хоть что то, тоже. Все они заканчивались выводом разнообразных ошибок при коммите (commit), например:

peer-unit needs to be configured for logical tunnel interface
error: configuration check-out failed
encapsulation needs to be configured for logical tunnel interface
error: configuration check-out failed

Или о том что интерфейсы реальной системы пересекаются с виртуальной:

Interface lt-1/2/0.1 is also configured at the top-level
error: configuration check-out failed

Либо реальная система не видела виртуальную (не было пинга).

Ну что ж, обратимся к великому гуглу ! Но толи я не так искал, тли не так читал 🙂 не знаю, но ответа на свой вопрос я по прежнему не получил.

Листая форум на juniper.net, а затем  повторное прочтение Configuring Logical Tunnel Interfaces навели меня на мысль о том, что нужно и в реальном (main) роутере и в виртуальном настраивать именно туннельный интерфейс и «натравливать» их друг на друга.

Ну что ж, попробуем. Начнем с интерфейсов.

Для начала создадим наш логический роутер (для примера имя ему дадим virtual-bgp-router), переходим в режим конфигурации и начинаем:

[edit]
root@juniper#
set logical-systems virtual-bgp-router

Затем создадим наш туннельный интерфейс, я возьму номер 999, вы ессно можете указать любой понравившийся вам номер юнита, которого ещё нет на этом интерфейсе:

[edit]
root@juniper#
set logical-systems virtual-bgp-router interfaces lt-1/2/0 unit 999

Зададим инкапсуляцию:

[edit]
root@juniper#
set logical-systems virtual-bgp-router interfaces lt-1/2/0 unit 999 encapsulation ethernet

Зададим с каким юнитом основного (main) роутера  мы будем соединяться:

[edit]
root@juniper#
set logical-systems virtual-bgp-router interfaces lt-1/2/0 unit 999 peer-unit 333

Добавим IP-адрес на интерфейс:

[edit]
root@juniper#
set logical-systems virtual-bgp-router interfaces lt-1/2/0 unit 999 family inet address 192.168.1.2/24

Так, с виртуалкой  пока закончили, теперь нужно реальному роутеру объяснить что к чему. Настроим туннельный  интерфейс и на нем.

[edit]
root@juniper#
set interfaces lt-1/2/0 unit 333

Создали  unit 333, тот юнит, который мы указали при создании туннельного интерфейса в логическом роутере, в кач-ве peer-unit.

Затем все действия точно такие же как делали выше, зададим инкапсуляцию:

[edit]
root@juniper#
set  interfaces lt-1/2/0 unit 333 encapsulation ethernet

Зададим с каким юнитом виртуального роутера мы будем соединяться:

[edit]
root@juniper#
set interfaces lt-1/2/0 unit 333 peer-unit 999

Добавим IP-адрес на интерфейс:

[edit]
root@juniper#
set interfaces lt-1/2/0 unit 333 family inet address 192.168.1.1/24

Ну вот, в первом приближении и все. Коммитим конфигурацию и смотрим, все ли работает как надо.

Для начала проверим есть ли у нас пинг с реального роутера на виртуальный:

[edit]
root@juniper#
run ping 192.168.1.2
PING 192.168.1.2 (192.168.1.2): 56 data bytes
64 bytes from 192.168.1.2: icmp_seq=0 ttl=64 time=0.910 ms
64 bytes from 192.168.1.2: icmp_seq=1 ttl=64 time=0.802 ms
64 bytes from 192.168.1.2: icmp_seq=2 ttl=64 time=0.839 ms
^C
— 192.168.1.2 ping statistics —
3 packets transmitted, 3 packets received, 0% packet loss
round-trip min/avg/max/stddev = 0.802/0.850/0.910/0.045 ms

Затем наоборот, из виртуального на реальный:
[edit]
root@juniper#
run ping logical-system virtual-bgp-router 192.168.1.1
PING 192.168.1.1 (192.168.1.1): 56 data bytes
64 bytes from 192.168.1.1: icmp_seq=0 ttl=64 time=0.932 ms
64 bytes from 192.168.1.1: icmp_seq=1 ttl=64 time=0.842 ms
64 bytes from 192.168.1.1: icmp_seq=2 ttl=64 time=0.866 ms
^C
— 192.168.1.1 ping statistics —
3 packets transmitted, 3 packets received, 0% packet loss
round-trip min/avg/max/stddev = 0.842/0.880/0.932/0.038 ms

Пинг в наличии ! А значит и все остальное, по нашей задаче BGP пиринг между реальной системой и виртуальной, уже можно воплощать в жизнь.

Как поднимать BGP на Juniper в этой статье я расписывать не буду, т.к. уже делал это в статье «Настройка протокола BGP на оборудовании Juniper«, скажу лишь что в виртуальном роутере все настраивается точно так же как и в реальном, т.е. переходим в режиме редактирования в «ветку» своего виртуального роутера:

[edit]
root@juniper#
edit logical-systems virtual-bgp-router

Забываем о том, что это виртуалка и настраиваем так же как обычный роутер. Т.е. поехали:

[edit]
root@juniper#
set protocols bgp local-as 12345

где «12345»  есть наша свежеполученная AS, затем настраиваем BGP пир (создаем BGP соседа  192.168.1.1 (реальный роутер) и т.д. и т.п.

После того как вы закончите с настройкой протокола BGP на виртуальном роутере, не забудьте создать BGP соседа (192.168.1.2) и в реальном роутере.

По итогу получаем самое обычное взаимоотношение по протоколу BGP между реальным роутером и виртуальным 😉

Реальный роутер видит по BGP виртуальный и получает от него один свой префикс от новой ASки:
root@juniper> show bgp summary | match 192.168.1.2

192.168.1.2 12345 2629 77689 0 0 01:40:19 1/1/1/0 0/0/0/0

Ну и наборот, виртуальный видит реальный роутер, который сгружает ему full-view таблицу:
root@juniper> show bgp summary logical-system virtual-bgp-router

Groups: 1 Peers: 1 Down peers: 0

Peer                     AS      InPkt     OutPkt    OutQ   Flaps Last Up/Dwn State|#Active/Received/Accepted/Damped...
192.168.1.1         54321      77697       2639       0       0    01:44:37 323070/323070/323070/0  0/0/0/0

З.Ы. Внутри виртуального роутера можно создавать и реальные интерфейсы этого роутера, таким образом вы можете связать виртуальный роутер с любой внешней железкой.

З.Ы.Ы. При копировании статьи ссылка на источник ОБЯЗАТЕЛЬНА ! Пожалуйста, уважайте чужой труд.

Автор: Николаев Дмитрий (virus (at) subnets.ru)

Ничего не понялТак себе...Не плохоДовольно интересноОтлично ! То что нужно ! (голосов: 3, среднее: 2,67 из 5)
Загрузка...
Отправить на почту Отправить на почту

Рассмотрим пример настройки протокола BGP на оборудовании Cisco Systems.

В основном принципе настройка на Cisco ничем не отличается от настройки BGP на FreeBSD используя Quagga.

Для примера возьмем немного другую ситуацию чем в предыдущей статье, итак:

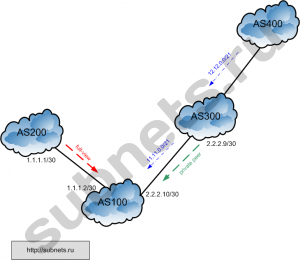
схема BGP

AS100 — наш номер ASки

5.5.0.0/20 — анонсируемый нами префикс (наш блок адресов)

AS200 — наш апстрим, который отдает нам full-view (полную таблицу маршрутов)

AS300 — наш privat peer (приватный пир), который отдает нам маршруты в свою AS и своего клиента AS400.

С чего начать ?

С настройки интерфейсов конечно.

GigabitEthernet3/0 — AS200
GigabitEthernet3/1 — AS300

Зайдите на router телнетом и перейдите в enable режим.

cisco# conf t
cisco(config)# interface GigabitEthernet3/0
cisco(config-if)# ip address 1.1.1.2 255.255.255.252
cisco(config-if)# interface GigabitEthernet3/1
cisco(config-if)# ip address 2.2.2.10 255.255.255.252
cisco(config-if)# exit

Добавим маршруты, сначала отправим туда, откуда не возвращаются :), маршруты в «серые сети»:


cisco(config)# ip route 10.0.0.0 255.0.0.0 Null0 254
cisco(config)# ip route 172.16.0.0 255.240.0.0 Null0 254
cisco(config)# ip route 192.168.0.0 255.255.0.0 Null0 254

Затем добавим маршрут на свой полный блок:


cisco(config)# ip route 5.5.0.0 255.255.240.0 Null0 254

Протокол BGP не будет анонсировать префикс, пока сам не узнает маршрут до него.
Именно для этого мы и создали этот маршрут, который будет присутствовать в таблице маршрутизации всегда.
Вы можете пророутить внутрь своей сети как полный блок (тогда маршрут в Null0 (нуль ноль) можно и не добавлять) так и его, побитые на подсети, части.  Например подсети по /21:

cisco(config)# ip route 5.5.0.0 255.255.248.0 10.0.0.2
cisco(config)# ip route 5.5.0.0 255.255.248.0 10.0.0.3

Где:

  • 10.0.0.2
  • 10.0.0.3

маршрутизаторы внутри сети. Ессно, что они должны быть доступны с маршрутизатора BGP.

Роутер всегда отправляет пакеты по маршруту с лучшим совпадением по маске, именно поэтому маршрут в Null0 и два маршрута, которые мы сделали выше, будут прекрасно сосуществовать и пакеты будут идти на хосты 10.0.0.2 и 10.0.0.3, т.к. у них более точное совпадение по маске.

Приступим к созданию необходимых route-map. Сначала начнем со всего «серого» (адресов и номеров AS).

Создадим необходимые prefix-list и as-path access-list.

Маршрут в default:
cisco(config)# ip prefix-list bogons description bogus nets
cisco(config)# ip prefix-list bogons seq 15 permit 0.0.0.0/8 le 32

Затем остальное:
cisco(config)# ip prefix-list bogons seq 20 permit 127.0.0.0/8 le 32
cisco(config)# ip prefix-list bogons seq 25 permit 192.0.2.0/24 le 32
cisco(config)# ip prefix-list bogons seq 30 permit 10.0.0.0/8 le 32
cisco(config)# ip prefix-list bogons seq 35 permit 172.16.0.0/12 le 32
cisco(config)# ip prefix-list bogons seq 40 permit 192.168.0.0/16 le 32
cisco(config)# ip prefix-list bogons seq 45 permit 169.254.0.0/16 le 32
cisco(config)# ip prefix-list bogons seq 50 permit 192.42.172.0/24 le 32
cisco(config)# ip prefix-list bogons seq 55 permit 198.18.0.0/15 le 32
cisco(config)# ip prefix-list bogons seq 60 permit 192.88.99.0/24 le 32
cisco(config)# ip prefix-list bogons seq 65 permit 224.0.0.0/4 le 32
cisco(config)# ip prefix-list bogons seq 70 permit 240.0.0.0/4 le 32

Теперь «серые» номера AS`ок:
cisco(config)# ip as-path access-list 1 permit _6451[2-9]_
cisco(config)# ip as-path access-list 1 permit _645[2-9][0-9]_
cisco(config)# ip as-path access-list 1 permit _64[6-9][0-9][0-9]_
cisco(config)# ip as-path access-list 1 permit _65[0-9][0-9][0-9]_

Создадим маршрутную карту на IN для AS200 (нашего апстрима).
Запрещаем маршруты с «серыми» номерами AS в as-path, то что матчит (разрешает (permit)) наш as-path access-list, то запрещает наша следующая маршрутная карта:

cisco(config)# route-map map-AS200-in deny 100
cisco(config-route-map)# description — filter private ASs
cisco(config-route-map)# match as-path 1
cisco(config-route-map)# exit

Теперь по маршруту по умолчанию и «серым» сетям, логика действия как и в пред. случае, запрещаем то что permit в prefix-list bogons:

cisco(config)# route-map map-AS200-in deny 110
cisco(config-route-map)# description — — filter bogons
cisco(config-route-map)# match ip address prefix-list bogons
cisco(config-route-map)# exit

Ну и последнее, т.к. мы хотим принимать от AS200 full-view (т.е. полную таблицу), то:

  • разрешаем все остальные маршруты
  • выставляем local-preference по умолчанию внутри своей AS

cisco(config)# route-map map-AS200-in permit 200
cisco(config-route-map)# description — permit any else, set default loc-pref
cisco(config-route-map)# set local-preference 100
cisco(config-route-map)# exit

Создадим маршрутную карту на OUT для AS200 (нашего апстрима). Эта маршрутная карта нужна нам для того, чтобы наша AS анонсировала только свой префикс. Если маршрутной карты на OUT не будет, то ваша AS будет анонсировать всем своим соседям все известные ей маршруты и вы, сами того не желая, дадите возможность прогонять через вас трафик.
Но прежде создадим префикс лист со своим префиксом:

cisco(config)# ip prefix-list own-prefixes permit 5.5.0.0/20

Вот теперь вернемся к маршрутке на OUT:

cisco(config)# route-map map-AS200-out permit 100
cisco(config-route-map)# description — permit our prefixes
cisco(config-route-map)# match ip address prefix-list own-prefixes
cisco(config-route-map)# exit

Т.к. в конце маршрутки по умолчанию идет неявный deny, то все остальные префиксы (маршруты) будут запрещены.

Настало время приступить к маршрутным картам для нашего private peer`а.
Т.к. от него мы собираемся получать только маршруты принадлежащие ему (AS300) и его клиенту (AS400), то будет проще, разрешим только необходимые префиксы, а все остальное запретим:

cisco(config)# ip prefix-list peer-prefixes permit 11.11.0.0/21
cisco(config)# ip prefix-list peer-prefixes permit 12.12.0.0/21

Теперь можно создать маршрутную карту на IN, в которой разрешим необходимые префиксы и поднимем loc-pref, на данные префиксы, чтобы маршруты полученные от этого пира имели приоритет над маршрутами к этим префиксам полученными от других апстримов/пиров:

cisco(config)# route-map map-AS300-in permit 100
cisco(config-route-map)# description — — permit peer prefix
cisco(config-route-map)# match ip address prefix-list peer-prefixes
cisco(config-route-map)# set local-preference 200
cisco(config-route-map)# exit

Ну и тут не обойдется без маршрутной карты на OUT:

cisco(config)# route-map map-AS300-out permit 100
cisco(config-route-map)# description — permit our prefixes
cisco(config-route-map)# match ip address prefix-list own-prefixes
cisco(config-route-map)# exit

Зачем мы создали две маршрутные карты на OUT с разными названиями, но с одинаковым содержимым ?
Ответ прост. Если, в последствии, нам нужно будет, например добавить community к своему маршруту или оглашать свой блок меньшими подсетями, то все равно придется делать разные маршрутные карты, вот поэтому сделаем это сразу, чтобы потом не изменять конфигурацию bgp, а просто подправить маршрутную карту.

Закончим подготовку перед настройкой BGP:

cisco(config)# ip classless
cisco(config)# ip routing
cisco(config)# ip subnet-zero

Подготовку мы сделали, теперь можно переходить непосредственно к настройке и запуску BGP.

cisco(config)# router bgp 100
cisco(config-router)# no synchronization
cisco(config-router)# bgp log-neighbor-changes
cisco(config-router)# bgp deterministic-med

Объявим наш префикс:
cisco(config-router)# network 5.5.0.0 mask 255.255.240.0

Пропишем наего апстрима AS200:
cisco(config-router)# neighbor 1.1.1.1 remote-as 200
cisco(config-router)# neighbor 1.1.1.1 description AS200-upstream
cisco(config-router)# neighbor 1.1.1.1 send-community
cisco(config-router)# neighbor 1.1.1.1 version 4
cisco(config-router)# neighbor 1.1.1.1 soft-reconfiguration inbound
cisco(config-router)# neighbor 1.1.1.1 route-map map-AS200-in in
cisco(config-router)# neighbor 1.1.1.1 route-map map-AS200-out out

Пропишем нашего private peer`а:
cisco(config-router)# neighbor 2.2.2.9 remote-as 300
cisco(config-router)# neighbor 2.2.2.9 description AS300-private-peer
cisco(config-router)# neighbor 2.2.2.9 send-community
cisco(config-router)# neighbor 2.2.2.9 version 4
cisco(config-router)# neighbor 2.2.2.9 soft-reconfiguration inbound
cisco(config-router)# neighbor 2.2.2.9 route-map map-AS300-in in
cisco(config-router)# neighbor 2.2.2.9 route-map map-AS300-out out

Заканчиваем:
cisco(config-router)# distance bgp 180 200 200
cisco(config-router)# no auto-summary
cisco(config-router)# exit
cisco(config)# exit
cisco# wri

После запуска посмотрите, что все настроенные BGP сессии поднялись. Команда:
cisco# show ip bgp summary

Так же стоит взгянуть что именно мы огласили нашему апстриму:
cisco# show ip bgp neighbors 1.1.1.1 advertised-routes

И нашему private peer`у:
cisco# show ip bgp neighbors 2.2.2.9 advertised-routes

Можно взглянуть и что мы от них получили:
cisco# show ip bgp neighbors 1.1.1.1 received-routes
cisco# show ip bgp neighbors 2.2.2.9 received-routes

После того как вы убедились, что все соответствует задуманному можно расслабиться и выпить пива 🙂


Заметка:
После каждого изменения route-map, в процессе работы, чтобы изменения вступили в силу необходимо оборвать (clear`нуть) BGP сессию с сосседом. Для того чтобы этого не делать и существует команда soft-reconfiguration inbound при настройке neighbor. Она заставляет роутер хранить маршруты полученные от соседа не только после обработки вашими route-map, но и до этого.
Тем самым вы не обрываете сессию с соседом, а роутер просто берет сохраненные у себя маршруты, которые пришли от соседа и сохранены в первозданном виде ДО обработки вашими route-map и снова прогоняет их через уже измененную route-map.
Например вы изменили route-map map-AS200-in, значит нуна клирнуть сессию с соседом IP-адрес 1.1.1.1.
cisco# clear ip bgp 1.1.1.1 soft in


Заметка:
Если вы хотите принимать от BGP соседа маршруты не более определенной маски, то необходимо создать prefix-list с указанием le или ge:

  • eq — Matches the exact prefix length
  • ge — Matches a prefix length that is equal to or greater than the configured prefix length
  • le — Matches a prefix length that is equal to or less than the configured prefix length

Например: принимать все маршруты с любым префиксом, но не более /24:
cisco(config)# ip prefix-list prefix-range seq 5 permit 0.0.0.0/0 le 24
cisco(config)# route-map peer-in permit 200
cisco(config-route-map)# match ip address prefix-list prefix-range


Полезные ссылки:

З.Ы. При копировании статьи ссылка на источник ОБЯЗАТЕЛЬНА !

Автор: Николаев Дмитрий (virus (at) subnets.ru)
Ничего не понялТак себе...Не плохоДовольно интересноОтлично ! То что нужно ! (голосов: 14, среднее: 3,93 из 5)
Загрузка...
Отправить на почту Отправить на почту

Все вы, у кого есть своя ASка, получили письмо от RIPE:

From: Andrew de la Haye <noreply@ripe.net>
Subject: 32-bit AS Numbers: A Change Is Coming!

Dear Colleagues,

As of 1 January 2009, the RIPE NCC will begin assigning 32-bit (or four-byte) ASN Numbers (ASNs) by default. This is in accordance with a global
policy agreed on in all Regional Internet Registry (RIR) communities.

When requesting an ASN after 1 January, LIR staff should ensure that 32-bit ASNs will be compatible with their existing networks. Some network
operators may experience difficulties configuring BGP sessions if their or their upstream providers' equipment is not compliant with the new
32-bit standard.

If you believe your network will encounter problems with 32-bit ASNs, it will be possible to specifically request a 16-bit ASN.

For more information, please see, "32-bit Autonomous System Numbers: A Guide for LIRs":
http://www.ripe.net/news/asn-32-guide.html

If you have any questions regarding 32-bit ASNs, please send an email to <contact@ripe.net>.

Regards,
Andrew de la Haye
Chief Operations Officer, RIPE NCC

Один знакомый бросил ссылочку на интересную статейку и мы решили запостить и у нас:

Understanding 4-Byte Autonomous System Numbers

For all the harping I do on this blog about IPv4 address depletion and the need to prepare yourselves for IPv6, there is another number resource that is also being quickly depleted, and that I haven’t written about before: the 2-byte autonomous system numbers (ASNs).

A 16-bit number space gives you 65,536 possible numbers (AS numbers 0 – 65535). Out of these, the IANA reserves 1,026 of them: 64512 – 65534 for private, reusable ASNs (similar to private RFC1918 IPv4 addresses) and a few others such as 0 and 65535 and one that is important to this article, 23456. Presently 49,150 ASNs have been allocated out of the public pool, so there are 15,360 available ASNs remaining: About 23.8 percent of the public pool.

An analysis of the allocation rate of 2-byte ASNs shows that the available pool will run out in mid-2011. Eerily close to the date that we will run out of IPv4 addresses.

Fortunately there is much less cause for concern about ASN depletion than about IPv4 depletion, for two reasons:

  • Unlike IP addresses, which are necessary for anyone that wants to connect to an IP network, autonomous system numbers matter only to networks that are running BGP.
  • Just as IPv6 was created to solve the IPv4 problem by offering an address size four times as large, 4-byte ASNs have been created to solve the 2-byte ASN depletion problem. But where transition to IPv6 can be complicated because of lack of interoperability between IPv4 and IPv6, the transition to 4-byte ASNs is far simpler.

This post describes the format of the 4-byte ASN, how it interoperates with 2-byte ASNs, and what you need to do (if anything) to prepare your network for them.

The 4-Byte ASN Format

4-byte ASNs provide 232 or 4,294,967,296 autonomous system numbers ranging from 0 to 4294967295. The first thing to notice about these numbers is that they include all of the older 2-byte ASNs, 0 through 65535. That greatly helps with interoperability between autonomous systems using 2-byte ASNs and those using 4-byte ASNs. (An oft-heard complaint about IPv6 is that interoperability with IPv4 could have been more easily supported if 4.3 billion IPv6 addresses had been reserved as representative of the existing IPv4 addresses, but that’s another story.)

A 4-byte ASN between 0 and 65535 is called a mappable ASN, because it can be represented in just 2 bytes; the first 16 bits are in every case all zeroes.

Stemming from a concern that 32-bit ASNs might be difficult to write and manage, there are three ways of representing 4-byte ASNs:

· asplain is a simple decimal representation of the ASN, from 0 to 4294967295.

· asdot+ breaks the number up into low-order and high-order 16-bit values, separated by a dot. All of the older 2-byte ASNs can be represented in the low-order value, with the high-order value set to 0. So for example, 65535 is 0.65535. One more than that, 65536, is outside the value that can be represented in the low-order range alone, and is therefore represented as 1.0. 65537 would be 1.1, 65680 is 1.144, and so on. You can figure the low- and high-order values by subtracting multiples of 65,536 from the asplain representation of the ASN, with the high-order value representing the multiples of 65536. The ASN 327700, then, is 5.20: Five times 65536 plus 20 more. The largest ASN, 4294967295, is 65535.65535: 65,535 times 65535, plus 65535 more.

· asdot is a mixture of asplain and asdot+. Any ASN in the 2-byte range of 0 – 65535 is written in asplain (so 65535 is written “65535”) and any ASN above that range is written in asdot+ (so 65536 is written “1.0”).

Asplain is obviously the most straightforward method of understanding the new ASNs, although the larger numbers might become unwieldy to write and therefore prone to typographical mistakes in written documentation or router configurations.

Asdot+ is much simpler to write, but harder to calculate from its simple decimal equivalent. If you work in this format regularly, it’s probably worth your time to write a simple script that does the conversions for you to prevent calculation errors.

Asdot might appear to have limited usefulness. After all, it’s not any harder to write “0.3657” than to write “3657”, and the need to do some calculations come in when you go above 65535; asdot does nothing to help you there. There is, however, a subtlety to this. The regional number assignment authorities – the Regional Internet Registries, or RIRs – differentiate a 16-bit number that is an older 2-byte ASN and a mappable 4-byte ASN (again, the set of 32-bit ASNs in which the first 16 bits are all 0). So “3657” is a 2-byte ASN, and “0.3657” is a 4-byte ASN.

This, of course, leads us to look briefly at just what the RIRs’ policies are for assigning 4-byte ASNs.

ASN Allocation Policies

All five of the RIRs (AfriNIC, APNIC, ARIN, LACNIC, and RIPE NCC) have the same assignment policies for 4-byte ASNs:

· 4-byte ASNs have been available since 1 January 2007. The default assignment, if you request an ASN, is to give you a 2-byte ASN and only assign a 4-byte ASN if you specifically request it.

· Beginning on 1 January 2009 (yes, about a month from now!) that policy reverses: A 4-byte ASN will be the default. You can still get a 2-byte ASN, but only if you specifically request it.

· A year later, on 1 January 2010, all ASN assignments will be 4-byte. The ASN you receive might be of the form 0.XX (where the high-order 16 bits are all 0 and the low-order 16 bits are not), but the RIRs will make no distinction between those numbers and any other 4-byte ASN. And although it won’t effect your network in any way, the 16-bit ASN you’ve had maybe for years will, in the eyes of the RIRs, be a mapable 32-bit ASN. For instance, Level3 Communications’ AS3356 becomes in the eyes of the RIRs, at the beginning of 2010, 0.3356.

These policies raise several questions:

· If you plan to request a new ASN assignment starting in 2009, what do you need to do to prepare for it?

· How do the new 4-byte ASNs interoperate with older autonomous systems using 2-byte ASNs?

· If you have an existing 2-byte ASN, does anything change?

The ASN’s Role in BGP

A brief review of how BGP uses autonomous system numbers will help in understanding how the new format might impact BGP networks. Most of you already know the basics of BGP; if you do, feel free to skip ahead.

The purpose of BGP, unlike any IGP (OSPF, IS-IS, EIGRP and RIP), is to route between domains under separate administrative control – that is, systems that are autonomous from each other. If you’re going to route between (and among) these autonomous routing domains, you need some way of identifying individual ASs. That identifier is the autonomous system number.

The ASN has two essential functions in BGP:

First, it helps BGP determine the shortest path to a destination. When BGP advertises a route to a neighbor in an Update message, it attaches several path attributes to the route. When a router learns more than one BGP route to the same destination, the BGP decision process evaluates the routes’ path attributes in a prioritized order to decide which of the routes is most preferable. (BGP path attributes can be added, removed, or changed in all sorts of ways to influence the BGP decision process. This is the basis for BGP routing policies.) One of these attributes, attached to every BGP route, is called AS_PATH. When a router advertises a destination within its own AS to a neighbor in another AS, it puts its local ASN in the AS_PATH. As the route is advertised to subsequent autonomous systems, each AS border router adds its own ASN to the attribute. The AS_PATH, then, becomes a list of ASNs that describes the path back to the destination. A router can choose a shortest path by choosing the route with the fewest ASNs listed in its AS_PATH.

The second ASN function is a very simple loop avoidance mechanism. Because a router adds its ASN to the AS_PATH before advertising a route to a neighbor in another AS, a route that loops – that is, exits an AS and is subsequently advertised back to the same AS – is easily detected by examining the AS_PATH. If a router sees its own ASN listed in the AS_PATH of a route advertised to it by a neighbor, it drops the route.

The ASN also appears in a path attribute called the AGGREGATOR. When a number of routes are summarized (aggregated), route details can be lost. The AGGREGATOR attribute can be added to an aggregate route to indicate the Router ID and ASN of the router performing the aggregation. This attribute does not influence the BGP decision process, but it can be useful for tracing back problems with aggregate routes.

A third attribute that uses the ASN is COMMUNITIES. This optional attribute helps you manage routing polices when they apply to a large number of routes; using a number of methods you can assign one or more COMMUNITIES attributes to prefixes, and then apply a routing policy to a community rather than individual routes. For example, you might define a COMMUNITES attribute named Cust_Routes and then add that attribute to all routes advertised into your AS by all your customers. Then anywhere in your network that you need to apply a policy to all of your customer routes, you can apply the policy to routes having the Customer_Routes attribute rather than having to identify each prefix (and possibly change all your prefix lists any time a customer route is added or removed).

The COMMUNITES attribute is a 32-bit value in which the first 16 bits are an ASN and the last 16 bits are arbitrarily assigned by you to have whatever meaning you want.

The important point here is not so much the functions of AGGREGATOR or COMMUNITES, however, but that they, like AS_PATH, are formatted to carry 2-byte ASNs; the formats of these attributes must therefore be adapted to carry the larger 32-bit ASNs.

In addition to these three path attributes the BGP Open message also references the ASN, in a 16-bit field called My Autonomous System. BGP runs on top of a TCP session between neighbors; after the TCP session is established, the neighbors use Open messages to negotiate the BGP session. Each neighbor indicates its Router ID, ASN, the BGP version it is running (always version 4 in modern networks), its hold time (the time it expects to wait for a Keepalive from the neighbor before closing the session) and possibly some optional parameters.

There is alot more to BGP than what has been described here. What is important for this discussion is that there are four BGP data entities that carry ASNs:

· The AS_PATH attribute;

· The AGGREGATOR attribute;

· The COMUNITES attribute; and

· The Open message

Consideration must be given to each of these entities not only in terms of adapting them to 4-byte ASNs but also making the adaptations interoperable with older BGP implementations that only understand 2-byte ASNs.

Neighbor Interoperability

For simplicity, we’ll call BGP implementations supporting 4-byte ASNs New_BGP, and legacy BGP implementations that only support 2-byte ASNs Old_BGP.

The first requirement for a New_BGP implementation is to discover whether a neighbor is New_BGP or Old_BGP. It does this by using the BGP Capability Advertisement when opening a BGP session. In addition to advertising itself as New_BGP, it includes its 4-byte ASN in the Capability advertisement.

If a neighbor responds that it also is a NEW_BGP speaker, the neighbor includes its 4-byte ASN in its own Capability advertisement. Thus two New_BGP neighbors can inform each other of their 4-byte ASNs without using the 2-byte My Autonomous System field in the Open message. (If the neighbors are NEW_BGP but have 2-byte ASNs or mappable 4-byte ASNs, they can still put the ASN in the My Autonomous System field in addition to the Capability advertisement.)

If a neighbor is Old-BGP, it either responds that it does not support the 4-byte ASN capability or does not respond to the Capability advertisement at all. In this case, the New_BGP neighbor can still bring up a session with the Old-BGP neighbor, but cannot advertise its 4-byte ASN. The neighbor wouldn’t understand it. Instead, New_BGP uses a reserved 2-byte ASN, 23456, called AS_TRANS (AS_TRANS is easily remembered because of its 2-3-4-5-6 sequence). This AS number is added to the My Autonomous System field of the Open message. Because AS_TRANS is reserved, no Old_BGP speaker can use it as its own ASN; only New_BGP speakers can use it.

Interoperable peering, then, is achieved because the New_BGP speaker “knows” its neighbor is an Old_BGP speaker and adapts to it; the Old-BGP speaker simply continues using legacy BGP rules.

Path Attribute Interoperability

Because the New_BGP speaker knows whether its neighbor is New_BGP or Old_BGP, it knows what rules to follow when advertising routes to the neighbor.

When advertising routes to a New_BGP neighbor, the AS_PATH attribute is simply modified to carry 4-byte ASNs. But when advertising routes to an Old-BGP neighbor, the AS_PATH must be kept in its legacy format, as a list of 2-byte ASNs; an Old_BGP neighbor would not otherwise know how to interpret the list. Rather than adding its own 4-byte ASN to the AS_PATH, the New_BGP speaker adds the AS_TRANS (again, AS23456) to the AS_PATH as a placeholder for its own and any other 4-byte ASNs appearing on the path. The router also adds a new attribute, AS4_PATH, to the route. This attribute carries the list of real ASNs, both 4-byte and 2-byte. Unlike AS_PATH, which is a mandatory attribute for all routes, AS4_PATH is optional transitive: “Optional” meaning it is only used when needed (and in fact a New_BGP speaker will not use this attribute if the AS_PATH is all 2-byte ASNs), and “transitive” meaning any BGP speaker passes the attribute along to other neighbors even if it doesn’t understand the attribute. Thus, the real autonomous system path can be passed transparently through one or more Old_BGP speakers.

When an Old_BGP speaker advertises a route with both AS_PATH and AS4_PATH attributes to a New_BGP speaker, the New_BGP speaker uses both attributes to reconstruct the path: AS4_PATH to find 4-byte ASNs on the path, and AS_PATH to find any 2-byte ASNs Old_BGP speakers will have added since the path last passed through a New_BGP speaker.

By adding AS_TRANS to the AS_PATH as a placeholder for any 4-byte ASNs along the route, the AS_PATH continues to accurately indicate the number of AS hops along the path, and therefore preserves its role in the BGP decision process. And although the AS_TRANS might wind up appearing multiple times in the AS_PATH, that ASN only has meaning to a New_BGP speaker – which will also use the AS4_PATH to reconstruct the path – so the loop avoidance function is also preserved: If a loop occurs, the New_BGP speaker using a 4-byte ASN will find its ASN in the AS4_PATH and drop the route.

The AGGREGATOR attribute, when it is needed, is modified similarly. A New_BGP speaker advertising a route to a New_BGP neighbor simply uses a modified version of the attribute that can carry a 4-byte ASN. If a New_BGP speaker advertises a route with the attribute to an Old_BGP speaker, and if the attribute contains a 4-byte ASN, the New_BGP speaker replaces the ASN with AS_TRANS and puts the real ASN in a new optional transitive attribute called AS4_AGREGATOR.

A New_BGP speaker receiving a route with AGGREGATOR and AS4_AGGREGATOR attributes from an Old_BGP neighbor replaces the AS_TRANS in the AGGREGATOR with the real 4-byte ASN in the AS4_AGGREGATOR.

BGP communities are supported in 4-byte ASN environments by using a new Extended Community attribute called the 4-Octet AS Specific BGP Extended Community (EXT_COMM). This Extended Community consists of a 4-byte ASN and a 2-byte arbitrary number; that is, the format is the same as the legacy COMMUNITIES attribute except the ASN part is 4 bytes instead of 2 bytes.

Preparing Your Network (Or Not)

All this interoperability that I’ve spent so many paragraphs describing to you means that New_BGP is backwards compatible with Old_BGP. This is good news if you currently run a network with a 2-byte ASN: You don’t need to do very much, at least in the near term, to get ready for 4-byte ASNs. Your AS will continue running just fine, even when New_BGP neighbors start peering with it.

If you will be acquiring a new ASN any time after the end of 2008 – and especially after the end of 2009 – there are a few things you will need to do to get your network ready for 4-byte ASNs.

First, of course, you need to insure that your router operating system supports New_BGP. Right now (the end of November 2008) the best information I can find is that the following OSs have New_BGP:

· Cisco Systems IOS-XR 3.4 and later (CRS only)

· Cisco Systems IOS-NX (“Nexus”)

· Cisco Systems IOS 12.2SRD for 7200 and 7600

· Cisco Systems IOS 12.5T for 1800/2800/3800, 7200, 7300

· Cisco Systems 12.2SB-Rel6 for 7200, 7300, 10000

· Cisco Systems 12.2SX for 6500

· Force 10 Networks FTOS 7.7.1.0 and later

· Juniper Networks’ JUNOS 9.1 and later

· Juniper Networks’ JUNOSe 4.1.0 and later

· OpenBGPD 3.9 and later

· Quagga 0.99.6 and later

· Redback SEOS (all versions)

Finding specifics of feature support on most any vendor’s website is like a hunt for buried treasure but seldom with a reward at the end, so if you know of other operating systems supporting New_BGP – or have corrections to my list here – please do post a comment. If unsure about your own network, check with your vendor representative.

The biggest challenge with upgrading to New_BGP is that by far the largest installed base of router operating systems is Cisco IOS, and as you can see from the list above the current IOS support is all in early technology (T) or service provider (S) releases, and restricted to certain platforms. Hopefully New_BGP finds its way into mainstream IOS code in early 2009.

Other aspects of your network operations that should be assessed for support of the new ASNs are:

· Any address management applications that reference the ASN

· Any BGP analysis or traffic engineering applications

· Potential effects on MPLS-based VPNs that use Route Distinguishers

· Applications that use Internet Route Registries (IRRs) to set or publish policies

· Routing policies that reference ASNs such as AS path filters and community lists

Do Autonomous Systems with 2-Byte ASNs Need to Do Anything?

As I said, if you currently run a network with a 2-byte ASN your network will continue running with no problems. But there is one thing you should do in the short term to prepare: You will see more and more instances of AS_TRANS making their appearance in AS_PATHs, and if you are a service provider multiple customers might begin peering with you using AS_TRANS. You need to be sure that your operators and troubleshooters know what this special ASN is, and that multiple instances of it in a single AS_PATH or multiple customers peering to you using it are not indicative of a problem.

For the longer term, it is a good idea to put New_BGP capability on your list of requirements as you plan for router operating system upgrades. You can upgrade to New_BGP router by router without effecting your network. Once all of your routers support 4-byte ASNs, you should convert your 2-byte ASN to the 4-byte 0.XX format.

Taking these steps will save you some future headaches by eliminating potential confusions caused by AS_TRANS, giving you clearer visibility to newer peers and across AS paths, improving your routing policy capabilities, and preventing roadblocks when you need to exchange EXT_COMM attributes with New_BGP peers.

Like IPv6, 4-byte ASNs are the future of the Internet. Although all 2-byte ASNs allocated before 2010 will continue to exist, they will eventually be just a part of the new 32-bit format rather than a separate type of autonomous system number.

Everyone should give some thought now to what you need to do to be prepared for this.

Оригинал статьи

Ничего не понялТак себе...Не плохоДовольно интересноОтлично ! То что нужно ! (голосов: 2, среднее: 5,00 из 5)
Загрузка...
Отправить на почту Отправить на почту

Итак, вы в качестве пограничного маршрутизатора своей AS выбрали маршрутизатор Juniper.

Поздравляю вас ! Вы сделали отличный выбор ! 😉

В этой статье я постараюсь рассказать как настроить протокол BGP на оборудовании этого производителя.

Это не how-to на все случаи в жизни, а пример, с которого можно хоть как-то начать постигать замечательное железо от Juniper.

В качестве примера буду использовать:

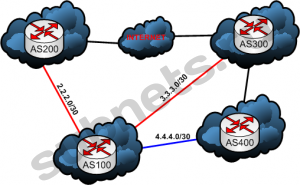
Наша автономная система: AS100

Наш префикс: 1.1.0.0/20

Схема подключения:

Два апстрима: AS200 (2.2.2.1/30) и AS300 (3.3.3.1/30)

И один прямой пиринг с AS400 (4.4.4.1/30)

Схема подключения

Схема подключения

Будем подразумевать, что соответствующие IP интерфейсы на маршрутизаторе вы уже настроили. Пример настройки интерфейсов можно посмотреть в этой статье и сделать по аналогии.

Настройка протокола BGP начинается с секции protocols.

Войдем в режим конфигурации:

root@juniper> configure

перейдем в раздел protocols bgp

[edit]
root@juniper#
edit protocols bgp

Начнем с того, что укажем номер своей автономной системы:

[edit protocols bgp]
root@juniper# set
local-as 100

Зададим логирование изменений состояния «соседей» (peer):

[edit protocols bgp]
root@juniper#
set log-updown

Воспользуемся следующей опцией, чтобы оглашать лучший маршрут даже если в таблице маршрутизации он не является активным маршрутом:

[edit protocols bgp]
root@juniper#
set advertise-inactive

Зададим route flap damping (так называемые «хлопающие» маршруты):

[edit protocols bgp]
root@juniper#
set damping

Укажем лог файл:

[edit protocols bgp]
root@juniper#
set traceoptions file bgp.log size 1m files 50

Теперь можно приступить к настройке соседей (peer). Как мы условились выше у нас два апстрима. Для удобства создадим группу upstreams:

[edit protocols bgp]
root@juniper# set group upstreams

перейдем в конфигурировние созданной группы:

[edit protocols bgp]
root@juniper# edit group upstreams

Укажем некоторые параметры для всей группы, например тип:

[edit protocols bgp group upstreams]
root@juniper# set type external

И несколько других параметров:

[edit protocols bgp group upstreams]
root@juniper# set description «Upstreams peers»

[edit protocols bgp group upstreams]
root@juniper# no-advertise-peer-as

Для Load-balancing включим multiple-as

[edit protocols bgp group upstreams]
root@juniper# set multipath multiple-as

Создадим первого соседа:

[edit protocols bgp group upstreams]
root@juniper# set neighbor
2.2.2.1 description Prov-1

Зададим его автомномную систему:

[edit protocols bgp group upstreams]
root@juniper# set neighbor
2.2.2.1 peer-as 200

Зададим маршрутные карты, которые будут отрабатываться при импорте маршрутов от этого соседа. У Juniper можно задавать «конвеер» маршрутных карт:

[edit protocols bgp group upstreams]
root@juniper# set neighbor
2.2.2.1 import [ bogus-reject bogus-ases default-route-reject Prov-1-in ]

Зададим маршрутные карты, которые будут отрабатываться при экспорте маршрутов от нас к соседу:

[edit protocols bgp group upstreams]
root@juniper# set neighbor
2.2.2.1 export Prov-1-out

Тоже самое сделаем и по второму апстриму:

[edit protocols bgp group upstreams]
root@juniper# set neighbor
3.3.3.1 description Prov-2

[edit protocols bgp group upstreams]
root@juniper# set neighbor
3.3.3.1 peer-as 300

[edit protocols bgp group upstreams]
root@juniper# set neighbor
3.3.3.1 import [ bogus-reject bogus-ases default-route-reject Prov-2-in ]

[edit protocols bgp group upstreams]
root@juniper# set neighbor
3.3.3.1 export Prov-2-out

Если вы собираетесь оглашать всем соседям этой группы одно и то же, то можно поступить немного проще, задав export сразу для всей группы (но это будет неудобно, т.к. в процессе использования BGP линков вы поймете, что не всегда всем апстримам нужно слать одно и то же):

[edit protocols bgp group upstreams]
root@juniper# set
export upstreams-out

С апстримами разобрались, теперь создадим группу для прямого пиринга:

[edit protocols bgp group upstreams]
root@juniper# up

[edit protocols bgp]
root@juniper# set group peers

[edit protocols bgp]
root@juniper# edit group peers

[edit protocols bgp group peers]
root@juniper# set type external

[edit protocols bgp group peers]
root@juniper# set description «Our peers»

[edit protocols bgp group peers]
root@juniper# no-advertise-peer-as

Создадим запись о прямом пиринге с AS400:

[edit protocols bgp group peers]
root@juniper# set neighbor
4.4.4.1 description Peer-1

[edit protocols bgp group peers]
root@juniper# set neighbor
4.4.4.1 peer-as 400

Т.к. это прямой пиринг, то и принимать от этого соседа мы будем только те маршруты которые относятся к его AS, а не full-view, поэтому в данном случае мы не делаем «конвеер».

[edit protocols bgp group peers]
root@juniper# set neighbor
4.4.4.1 import Peer-1-in

[edit protocols bgp group peers]
root@juniper# set neighbor
4.4.4.1 export Peer-1-out

Так мы выполнили первую часть. Можете взглянуть на свои труды:

[edit protocols bgp group peers]
root@juniper# up

[edit protocols bgp]
root@juniper# show group upstreams

[edit protocols bgp]
root@juniper# show group peers

Для меня оборудование Juniper сильно выделяется на фоне оборудования Cisco Systems тем, что измененная конфигурация вступает в силу только в одном случае, когда вы даете команду commit. До этого момента на маршрутизаторе действует предыдущая «закомиченная» (commited) конфигурация. Перед тем как применять/комитить конфигурацию, можно проверить её на ошибки:

[edit protocols bgp group upstreams]
root@juniper# commit check

Если вы сделали commit check на данном этапе, то Juniper обязательно ругнется на отсутвие маршрутных карт, т.к. мы их прописали у соседей, но ещё не создавали. Вот именно это, кстати не единственное, что меня очень радует в этом оборудовании, т.к. у Cisco Systems можно указать маршрутную карту на соседа, но забыть её создать и Cisco ничего не скажет по этому поводу, а Juniper не даст вам «закомитить» (выполнить команду commit) пока в конфигурации есть ошибки, в данном случае отсутствие маршрутных карт.

Теперь нужно заняться своими префиксами и маршрутными картами.

Перейдем в другую секцию конфигурации и разберемся с нашими маршрутами:

[edit protocols bgp]
root@juniper# top

[edit]
root@juniper# edit routing-options

Укажем свой router-id, обычно это IP адрес из вашего блока который есть на этом маршрутизаторе:

[edit routing-options]
root@juniper# set router-id 1.1.1.1

Снова укажем номер своей AS:

[edit routing-options]
root@juniper# set autonomous-system 100

Тут же зададим название маршрутной карты с политикой для load-balance:

[edit routing-options]
root@juniper# set forwarding-table export per-flow-load-balancing

Создадим статические маршруты для нашего блока /20, (т.к. вы должны уже знать то, что протокол BGP не будет оглашать те маршруты, для которых он не знает next-hop адреса) но разбив его на две части. Сделаем это для того, что бы каким-либо другим соседям, например при установке прямого пиринга с AS400 которая не является вашим апстримом, чтобы оглашать ей маршуты с большей маской и соответвенно они будут иметь больший приоритет при выборе маршрута из данной AS к вам:

[edit routing-options]
root@juniper# set static route
1.1.0.0/21 next-hop 1.1.1.2 retain readvertise

[edit routing-options]
root@juniper# set static route
1.1.8.0/21 next-hop 1.1.1.2 retain readvertise

IP-адрес 1.1.1.2 это следующий маршрутизатор внутри нашей AS100.

Т.к. это пограничный маршрутизатор, а значит «серые» сети не должны выходить за его пределы, выполним следущее (discard):

[edit routing-options]
root@juniper# set route 10.0.0.0/8 discard

[edit routing-options]
root@juniper# set route 172.16.0.0/12 discard

[edit routing-options]
root@juniper# set route 192.168.0.0/16 discard

Не будем «насиловать» лишними маршрутами своих апстримов и будем им оглашать весь блок /20 целиком. Для этого сделаем агрегирование:

[edit routing-options]
root@juniper# set aggregate route 1.1.0.0/20 discard

Посмотрим что получилось в этой секции:

[edit routing-options]
root@juniper# show

Настало время создать маршрутные карты. Начнем с per-flow-load-balancing.

Перейдем в другую секцию:

[edit routing-options]
root@juniper# top

[edit]
root@juniper# edit policy-options

Создадим для per-flow-load-balancing:

[edit policy-options]
root@juniper# set policy-statement per-flow-load-balancing term balance then load-balance per-packet

Приступим к дефолтным маршрутным картам для соседей.

Для начала bogus-reject:

[edit policy-options]
root@juniper# set
policy-statement bogus-reject from route-filter 127.0.0.0/8 orlonger

[edit policy-options]
root@juniper# set
policy-statement bogus-reject from route-filter 10.0.0.0/8 orlonger

[edit policy-options]
root@juniper# set
policy-statement bogus-reject from route-filter 172.16.0.0/12 orlonger

[edit policy-options]
root@juniper# set
policy-statement bogus-reject from route-filter 192.168.0.0/16 orlonger

[edit policy-options]
root@juniper# set
policy-statement bogus-reject from route-filter 169.254.0.0/16 orlonger

[edit policy-options]
root@juniper# set
policy-statement bogus-reject from route-filter 224.0.0.0/4 orlonger

[edit policy-options]
root@juniper# set
policy-statement bogus-reject from route-filter 240.0.0.0/4 orlonger

Так мы задали список маршрутов, теперь укажем что мы с ними хотим сделать, в т.ч., и не принимать такие маршруты:

[edit policy-options]
root@juniper# set
policy-statement bogus-reject then reject

Создадим default-route-reject для запрета приема default gateway по протоколу BGP:

[edit policy-options]
root@juniper# set
policy-statement default-route-reject from route-filter 0.0.0.0/0 exact

[edit policy-options]
root@juniper# set
policy-statement default-route-reject then reject

Создадим bogus-ases для запрета приема «серых» (private) номеров AS:

[edit policy-options]
root@juniper# set
policy-statement bogus-ases from as-path grey-as

[edit policy-options]
root@juniper# set
policy-statement bogus-ases then reject

[edit policy-options]
root@juniper# set
policy-statement as-path grey-as 64512-65535

Пришло время для карт для соседей. В маршрутных картах на in (input) вы можете «играться» с теми или иными маршрутами приходящими от соседей. Фильтровать что-то, поднимать local-prefence и т.п. Для примера покажу как поднять local-prefence на маршрутах, для которых ваш апстрим является origin (т.е. те маршруты, которые принадлежат его AS).

Итак Prov-1-in:

[edit policy-options]
root@juniper# set
policy-statement Prov-1-in term own-as from as-path prov-1-as

[edit policy-options]
root@juniper# set
policy-statement Prov-1-in term own-as then local-preference 200

[edit policy-options]
root@juniper# set
policy-statement Prov-1-in term own-as then accept

Теперь создадим as-path:

[edit policy-options]
root@juniper# set as-path
prov-1-as «.*200»

Т.к. orign AS для маршрута всегда находится в конце as-path, то я и задал регулярное выражение которое ищет AS200 в конце as-path. Подробнее о регулярных выражениях читайте в технической документации по вашей версии JUNOS. Вы можете использовать не только as-path, но и префиксы которые принадлежат данному апстриму. Это на ваш выбор. Я выбрал as-path потому, что бы каждый раз не лазать и не изменять конфиг когда у этого апстрима появится новый блок IP-адресов.

Теперь зададим последний этап обработки приходящих от этого апстрима маршутов и действий с ними. Т.к. у нас full-view, то логично, что мы разрешим все остальное:

[edit policy-options]
root@juniper# set
policy-statement Prov-1-in term final-accept then accept

Тут же вы можете выставить default local-preference для этого апстрима:

[edit policy-options]
root@juniper# set
policy-statement Prov-1-in term final-accept then local-preference 100

Проделайте тоже самое и для Prov-2-in подставив туда его значения создав policy-statement Prov-2-in и as-path с AS300.

Для примера для нашего прямого пира AS400 мы создадим маршрутку с его префиксами, а не с as-path:

[edit policy-options]
root@juniper# set
policy-statement Peer-1-in term own-prefix from prefix-list-filter peer-1-prefix exact

[edit policy-options]
root@juniper# set
policy-statement Peer-1-in term own-prefix then accept

Поднимем local-preference для этих маршрутов выше, чем все остальное:

[edit policy-options]
root@juniper# set
policy-statement Peer-1-in term own-prefix then local-preference 210

Теперь запретим все остальное (т.к. как я уже говорил это прямой пир, а не апстрим, а раз так то принимаем только те префиксы, которые ему принадлежат):

[edit policy-options]
root@juniper# set
policy-statement Peer-1-in term final-reject then reject

Ну и осталось создать peer-1-prefix который мы прописали выше и указать в нем префиксы, которые принадлежат AS400, допустим это будут префиксы:

  • 195.128.0.0/16
  • 77.87.224.0/21

[edit policy-options]
root@juniper# set prefix-list
peer-1-prefix 195.128.0.0/16

[edit policy-options]
root@juniper# set prefix-list
peer-1-prefix 77.87.224.0/21

Итак с приемом маршрутов разобрались, приступим к оглашению наших. Эта задача состоит из двух частей:

  • оглашение агрегированного маршрута для апстримов
  • оглашение разделенного блока /20 для прямого пира

При прописывании всех наших соседей мы использовали разные маршрутные карты для того, что бы у нас была возможность управлять анонсами для каждого соседа по разному. Это вам пригодится для управления входящим в вашу AS трафиком, например prepend`ом.

Начнем с AS200 (первый апстрим) и как мы условились апстримам мы оглашаем агрегированный маршрут:

[edit policy-options]
root@juniper# set
policy-statement Prov-1-out term my-prefix from protocol aggregate

[edit policy-options]
root@juniper# set
policy-statement Prov-1-out term my-prefix from policy our-CIDR-blocks-aggregated

[edit policy-options]
root@juniper# set
policy-statement Prov-1-out term my-prefix then accept

Создадим сам фильтр policy our-CIDR-blocks-aggregated:

[edit policy-options]
root@juniper# set
policy-statement our-CIDR-blocks-aggregated term AS100-prefix from route-filter 1.1.0.0/20 exact

[edit policy-options]
root@juniper# set
policy-statement our-CIDR-blocks-aggregated term AS100-prefix then accept

Т.к. на данном этапе мы всем апстримам оглашаем одно и тоже, то создайте Prov-2-out сами.

Теперь нужно сделать out для нашего прямого пира и оглашать мы ему будем две сети /21:

[edit policy-options]
root@juniper# set
policy-statement Peer-1-out term AS100-prefix from protocol static

[edit policy-options]
root@juniper# set
policy-statement Peer-1-out term AS100-prefix from policy our-CIDR-blocks

[edit policy-options]
root@juniper# set
policy-statement Peer-1-out term AS100-prefix then accept

[edit policy-options]
root@juniper# set
policy-statement Peer-1-out term final-reject then reject

[edit policy-options]
root@juniper# set
policy-statement our-CIDR-blocks term AS100-prefixes from route-filter 1.1.0.0/21 exact

[edit policy-options]
root@juniper# set
policy-statement our-CIDR-blocks term AS100-prefixes from route-filter 1.1.8.0/21 exact

[edit policy-options]
root@juniper# set
policy-statement our-CIDR-blocks term AS100-prefixes then accept

Ну вот вроде на первый взляд и все. Проверим все ли в порядке:

[edit policy-options]
root@juniper# commit check

Если в ответ вы получили сообщение:

configuration check succeeds

значит ошибок в конфигурации нет и вы можете применять её на маршрутизаторе. Сделаем это и добавим комментарий к этому конфигу:

[edit policy-options]
root@juniper# commit comment «My first configuration»

Juniper может хранить до 50-ти «закомиченных» конфигураций и вы всегда можете откатываться к любой их них, поэтому я рекомендую всегда добавлять комментарий к конфигу, чтобы потом различать их 🙂

Посмотреть состояние всех соседей можно командой:

[edit policy-options]
root@juniper# run show bgp summary

Т.к. мы все ещё находимся в режиме конфигурирования нам приходится добавлять ключевое слово run чтобы команда show отработала не на конфигурации.

Если мы выйдем из режима конфигурирования:

[edit policy-options]
root@juniper# exit

то тут слово run добавлять уже не нужно:

root@juniper> show bgp summary

Другие команды для просмотра состояний соседей, пришедших/отправленных им маршрутах и т.п. я рассмотрю в другой статье.

Мануал, по всем командам, вы можете прочитать в технической документации по вашей версии Junos на сайте производителя: www.juniper.net

Рекомендую полистать книгу:

JUNOS Cookbook
By Aviva Garrett
………………………………………..
Publisher: O’Reilly
Pub Date: April 2006
Print ISBN-10: 0-596-10014-0
Print ISBN-13: 978-0-59-610014-8
Pages: 682

Заранее прошу прощения за оЧепЯтки и неточности. По мере нахождения багов и замечаний статья будет изменяться.

З.Ы. При копировании статьи ссылка на источник ОБЯЗАТЕЛЬНА !

Автор: Николаев Дмитрий (virus (at) subnets.ru)
Ничего не понялТак себе...Не плохоДовольно интересноОтлично ! То что нужно ! (голосов: 15, среднее: 4,87 из 5)
Загрузка...
Отправить на почту Отправить на почту

Русская версия новости

Двое специалистов по IT-безопасности, Антон Капела (Anton Kapela) из 5Nines Data и Алекс Пилосов (Alex Pilosov) из Pilosoft, продемонстрировали методику, позволяющую тайно перехватывать интернет-трафик и даже модифицировать его на пути к адресату, пишет Wired. Это позволяет сделать протокол интернет-маршрутизации BGP (Border Gateway Protocol, протокол граничного шлюза)

Эксперты уже назвали обнаруженную «дырку» одной из самых крупных в Интернете и сравнивают ее с недавно обнаруженной DNS-уязвимостью, теоретически позволявшей злоумышленнику перенаправлять пользователя вместо нужного на любой сайт.

BGP является одним из основных интернет-протоколов и обеспечивает обмен информацией о маршрутах между целыми автономными системами, а не отдельными маршрутизаторами. Капела и Пилосов показали на конференции DefCon, как можно перехватить трафик, направляющийся в сеть конференции, переправить его в контролируемую ими систему в Нью-Йорке, а затем доставить обратно. Их схема не использует ошибок протокола — лишь его нормальные возможности.

Как пишет Wired, ранее перехватывать интернет-трафик, используя уязвимость BGP, были способны только разведывательные агентства. Они знали о недостатках протокола с 1998 года, с тех пор как эксперт по безопасности Пейтер Затко (Peiter Zatko) рассказал о ней Конгрессу и предположил, что может за полчаса нарушить работу всего Интернета, используя обнаруженную уязвимость.


Английская версия новости

Two security researchers have demonstrated a new technique to stealthily intercept internet traffic on a scale previously presumed to be unavailable to anyone outside of intelligence agencies like the National Security Agency.

The tactic exploits the internet routing protocol BGP (Border Gateway Protocol) to let an attacker surreptitiously monitor unencrypted internet traffic anywhere in the world, and even modify it before it reaches its destination.

The demonstration is only the latest attack to highlight fundamental security weaknesses in some of the internet’s core protocols. Those protocols were largely developed in the 1970s with the assumption that every node on the then-nascent network would be trustworthy. The world was reminded of the quaintness of that assumption in July, when researcher Dan Kaminsky disclosed a serious vulnerability in the DNS system. Experts say the new demonstration targets a potentially larger weakness.

«It’s a huge issue. It’s at least as big an issue as the DNS issue, if not bigger,» said Peiter «Mudge» Zatko, noted computer security expert and former member of the L0pht hacking group, who testified to Congress in 1998 that he could bring down the internet in 30 minutes using a similar BGP attack, and disclosed privately to government agents how BGP could also be exploited to eavesdrop. «I went around screaming my head about this about ten or twelve years ago…. We described this to intelligence agencies and to the National Security Council, in detail.»

The man-in-the-middle attack exploits BGP to fool routers into re-directing data to an eavesdropper’s network.

Anyone with a BGP router (ISPs, large corporations or anyone with space at a carrier hotel) could intercept data headed to a target IP address or group of addresses. The attack intercepts only traffic headed to target addresses, not from them, and it can’t always vacuum in traffic within a network — say, from one AT&T customer to another.

The method conceivably could be used for corporate espionage, nation-state spying or even by intelligence agencies looking to mine internet data without needing the cooperation of ISPs.

BGP eavesdropping has long been a theoretical weakness, but no one is known to have publicly demonstrated it until Anton «Tony» Kapela, data center and network director at 5Nines Data, and Alex Pilosov, CEO of Pilosoft, showed their technique at the recent DefCon hacker conference. The pair successfully intercepted traffic bound for the conference network and redirected it to a system they controlled in New York before routing it back to DefCon in Las Vegas.

The technique, devised by Pilosov, doesn’t exploit a bug or flaw in BGP. It simply exploits the natural way BGP works.

«We’re not doing anything out of the ordinary,» Kapela told Wired.com. «There’s no vulnerabilities, no protocol errors, there are no software problems. The problem arises (from) the level of interconnectivity that’s needed to maintain this mess, to keep it all working.»

The issue exists because BGP’s architecture is based on trust. To make it easy, say, for e-mail from Sprint customers in California to reach Telefonica customers in Spain, networks for these companies and others communicate through BGP routers to indicate when they’re the quickest, most efficient route for the data to reach its destination. But BGP assumes that when a router says it’s the best path, it’s telling the truth. That gullibility makes it easy for eavesdroppers to fool routers into sending them traffic.

Here’s how it works. When a user types a website name into his browser or clicks «send» to launch an e-mail, a Domain Name System server produces an IP address for the destination. A router belonging to the user’s ISP then consults a BGP table for the best route. That table is built from announcements, or «advertisements,» issued by ISPs and other networks — also known as Autonomous Systems, or ASes — declaring the range of IP addresses, or IP prefixes, to which they’ll deliver traffic.

The routing table searches for the destination IP address among those prefixes. If two ASes deliver to the address, the one with the more specific prefix «wins» the traffic. For example, one AS may advertise that it delivers to a group of 90,000 IP addresses, while another delivers to a subset of 24,000 of those addresses. If the destination IP address falls within both announcements, BGP will send data to the narrower, more specific one.

To intercept data, an eavesdropper would advertise a range of IP addresses he wished to target that was narrower than the chunk advertised by other networks. The advertisement would take just minutes to propagate worldwide, before data headed to those addresses would begin arriving to his network.

The attack is called an IP hijack and, on its face, isn’t new.

But in the past, known IP hijacks have created outages, which, because they were so obvious, were quickly noticed and fixed. That’s what occurred earlier this year when Pakistan Telecom inadvertently hijacked YouTube traffic from around the world. The traffic hit a dead-end in Pakistan, so it was apparent to everyone trying to visit YouTube that something was amiss.

Pilosov’s innovation is to forward the intercepted data silently to the actual destination, so that no outage occurs.

Ordinarily, this shouldn’t work — the data would boomerang back to the eavesdropper. But Pilosov and Kapela use a method called AS path prepending that causes a select number of BGP routers to reject their deceptive advertisement. They then use these ASes to forward the stolen data to its rightful recipients.

«Everyone … has assumed until now that you have to break something for a hijack to be useful,» Kapela said. «But what we showed here is that you don’t have to break anything. And if nothing breaks, who notices?»

Stephen Kent, chief scientist for information security at BBN Technologies, who has been working on solutions to fix the issue, said he demonstrated a similar BGP interception privately for the Departments of Defense and Homeland Security a few years ago.

Kapela said network engineers might notice an interception if they knew how to read BGP routing tables, but it would take expertise to interpret the data.

A handful of academic groups collect BGP routing information from cooperating ASes to monitor BGP updates that change traffic’s path. But without context, it can be difficult to distinguish a legitimate change from a malicious hijacking. There are reasons traffic that ordinarily travels one path could suddenly switch to another — say, if companies with separate ASes merged, or if a natural disaster put one network out of commission and another AS adopted its traffic. On good days, routing paths can remain fairly static. But «when the internet has a bad hair day,» Kent said, «the rate of (BGP path) updates goes up by a factor of 200 to 400.»

Kapela said eavesdropping could be thwarted if ISPs aggressively filtered to allow only authorized peers to draw traffic from their routers, and only for specific IP prefixes. But filtering is labor intensive, and if just one ISP declines to participate, it «breaks it for the rest of us,» he said.

«Providers can prevent our attack absolutely 100 percent,» Kapela said. «They simply don’t because it takes work, and to do sufficient filtering to prevent these kinds of attacks on a global scale is cost prohibitive.»

Filtering also requires ISPs to disclose the address space for all their customers, which is not information they want to hand competitors.

Filtering isn’t the only solution, though. Kent and others are devising processes to authenticate ownership of IP blocks, and validate the advertisements that ASes send to routers so they don’t just send traffic to whoever requests it.

Under the scheme, the five regional internet address registries would issue signed certificates to ISPs attesting to their address space and AS numbers. The ASes would then sign an authorization to initiate routes for their address space, which would be stored with the certificates in a repository accessible to all ISPs. If an AS advertised a new route for an IP prefix, it would be easy to verify if it had the right to do so.

The solution would authenticate only the first hop in a route to prevent unintentional hijacks, like Pakistan Telecom’s, but wouldn’t stop an eavesdropper from hijacking the second or third hop.

For this, Kent and BBN colleagues developed Secure BGP (SBGP), which would require BGP routers to digitally sign with a private key any prefix advertisement they propagated. An ISP would give peer routers certificates authorizing them to route its traffic; each peer on a route would sign a route advertisement and forward it to the next authorized hop.

«That means that nobody could put themselves into the chain, into the path, unless they had been authorized to do so by the preceding AS router in the path,» Kent said.

The drawback to this solution is that current routers lack the memory and processing power to generate and validate signatures. And router vendors have resisted upgrading them because their clients, ISPs, haven’t demanded it, due to the cost and man hours involved in swapping out routers.

Douglas Maughan, cybersecurity research program manager for the DHS’s Science and Technology Directorate, has helped fund research at BBN and elsewhere to resolve the BGP issue. But he’s had little luck convincing ISPs and router vendors to take steps to secure BGP.

«We haven’t seen the attacks, and so a lot of times people don’t start working on things and trying to fix them until they get attacked,» Maughan said. «(But) the YouTube (case) is the perfect example of an attack where somebody could have done much worse than what they did.»

ISPs, he said, have been holding their breath, «hoping that people don’t discover (this) and exploit it.»

«The only thing that can force them (to fix BGP) is if their customers … start to demand security solutions,» Maughan said.

Ссылки:

Ничего не понялТак себе...Не плохоДовольно интересноОтлично ! То что нужно ! (голосов: 3, среднее: 3,00 из 5)
Загрузка...
Отправить на почту Отправить на почту